Use literal statements to add additional text to XML data. For example, you might use the Internal Notes field or the Shipping Instructions field of an order to store and print data about a customer or the order itself. If you store more than one piece of data in this field, the data can become hard to read. Use literal statements to tag each piece of data for easier identification later.
![]() To add literal statements to XML data:
To add literal statements to XML data:
Right-click a transaction in the Trading Partner Tree and select Edit Transaction Map to display the transaction map.
In the Target XML column of either the received map or the reply/sent map, right-click the element to modify and select Modify Mapping to display the XML Mapping Conversion Editor dialog box.
If the element you select has a source element mapped to it, the source element displays in the Operation Stack field. If the element is not mapped, the Operation Stack field is blank.
From the Sources field, double-click Literal to add it to the Operation Stack field.
The Literal Value dialog box displays.
In the Literal Value field, type the text to insert as the literal statement.
Click OK to return to the XML Mapping Conversion Editor dialog box. The literal tag now displays in the Operation Stack field.
If necessary, move the tag to the correct place in the operation stack.
If you are adding a literal string to identify data, place that string before the element name in the operation stack. The placement in the stack determines how the operation functions.
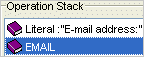
Using the example above, if you are mapping the Email element to the Internal Notes field for an order, the literal statement "Email address:" displays before the data in the Email element.
When adding literal statements to data, the system does not consider the operation valid until you concatenate the data being received or sent. Use the concatenate operation to form a valid expression.

The above operation displays the e-mail address as Email: user@address.com.
Add additional sources and other operations, as necessary.
Click OK to save the expression and return to the mapping utility main window.
From the File menu, select Save Transaction Map to save the map.
See Also: