Use Zone Maintenance to segment your warehouse locations into different areas, such as Front of Warehouse, Back of Warehouse, Yard, and Showroom, in order to track locations and to make receiving and picking more efficient.
In Zone Maintenance, you define locations by assigning a range of locations to a zone and a pick group.
For example, you have 4 zones and 4 pick groups in your warehouse: F, B, Y, and S.
Locations 01-01-A through 01-99-J are in zone and pick group F.
Locations 01-01-K through 01-99-Z are in zone and pick group B.
Define these locations to the system by assigning them to the correct zone and pick group.
When you assign locations to zones and pick groups, you can also assign parameters to the range of locations within the zone and pick group. For example, you can define a navigation path for picking a zone.
Important: If you define locations and location details in Location Detail Maintenance, you cannot use Zone Maintenance. |
Zones segment all of your inventory locations into areas, such as Yard, Showroom, Warehouse, and Self-Serve. Define zones for all of your inventory locations and use these zones to:
Help define pick groups.
Define areas that you do not bar code but that still hold product, such as the yard.
Define areas to which to lock totes for receiving and put away using the Lock Warehouse Zone To Tote In RF Receive Verify control maintenance record.
Define locations to queue for RF picking and to exclude from RF picking.
Define locations to exclude from RF picking but include in RF delivery preparation.
Pick groups define a location or group of locations that consolidate items for picking.
For example:
Define a pick group F for the front of your warehouse and another pick group B for the back of your warehouse. When the warehouse picker selects orders to pick, the system prompts for the pick group. If the picker enters F, only picks from the F area display.
Note: We recommend using one alpha character to define pick groups due to display restrictions when selecting orders to pick.
Along with pick groups, assign sort prefixes to determine a pick sequence for your warehouse.
For example:
Enter 0010 for the first location to pick, 0020 for the second, and 0030 for the third.
Note: We recommend that you name your sort prefixes in multiples of 10. This way if you need to add a new location between two other existing pick locations, you do not need to reassign all of the sort prefixes.
The system defaults the warehouse navigation for put away and picking to a sequence based on the location layout. The pick sequence allows you to override the system-defined navigation path.
You can create a pick sequence in Zone Maintenance or in Pick Sequence Entry.
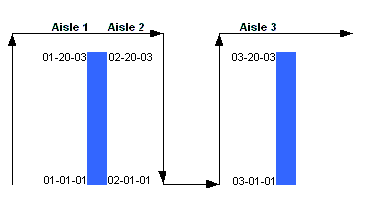
Pick sequences look like the following.
You have the pick group F, with the following locations:
01-01-01 to 01-20-03
02-01-01 to 02-20-03
03-01-01 to 03-20-03
You want the pick group picked in the following order:
01-01-01 to 01-20-03
02-20-03 to 02-01-01
03-01-01 to 03-20-03
To indicate that order, enter the following in the SortPrefix field:
Location |
Pick Group |
SortPrefix |
01-01-01 to 01-20-03 |
S |
0010 |
02-20-03 to 02-01-01 |
S |
0020 |
03-01-01 to 03-20-03 |
S |
0030 |
In Pick Sequence Entry, scan the beginning and ending location for each segment. Any time you break out of location sequence, scan the ending location and then the next beginning location. Depending on your location layout, sequencing affects whether, during picking or put away, you move up one side and down the other or choose to zigzag back and forth within the aisles.
See Also:
Defining Zones and Pick Groups for RF