Display the window from which you want to add a new menu option.
From the User
Tools menu  , select
Customize Menu Items to display
the User Defined Menu Maintenance window.
, select
Customize Menu Items to display
the User Defined Menu Maintenance window.
You can add custom menu options to core menus to launch either a user-defined screen or a web browser with a specific web page. For example, if you frequently search for product images, you can add a user-defined menu option to launch your default browser to Google™ for image searching.
You must have the SOLAR.EDIT.TOOLBAR authorization key set to Level 3 to create and maintain user-defined menu options. Any menu option you add can be viewed by all users. To restrict the usage of the menu option, use the Auth Key column to enter the authorization key that must be assigned in order to use the menu. This can be a user-defined authorization key or a current system authorization key. Using this option locks down the menu option to view-only mode except for those users with permission to perform the task.
To add a user-defined menu option:
Display the window from which you want to add a new menu option.
From the User
Tools menu , select
Customize Menu Items to display
the User Defined Menu Maintenance window.
The items displayed on the left hand side of the window correspond with the current menu options on the selected window, except the Edit, User Tools, and Help menus.
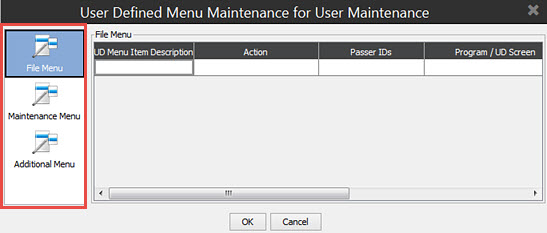
Select the menu from the left to which you want to add a menu option.
Use the following columns to define your new menu option:
|
Column |
Description |
|
UD Menu Item Description |
Enter the description you want to display on the menu, such as Google Item Search. |
|
Action |
Select what you want the option to do:
|
|
Passer IDs |
Specify one or more IDs (same as on Ctrl+F12) that will be used for the new screen or web page. |
|
Program / UD Screen |
|
|
Example 1 |
You want to add a menu item for searching Google for images of a product. The system has a routine that expects @ID to contain a Product ID. You write the program GOOGLE.SEARCH.PROD.DESC. This program expects @ID to contain a Product ID, as well. The program then reads the description of the product and places that in to the proper position of the Google URL. The URL is returned as the only parameter. |
|
Example 2 |
You want to add a menu item to run a program you have written to gather collection information. You set the fields as follows:
|
|
Respect View Only |
Select this check box to disable the menu option if the parent screen is in view-only mode. If a user is in a screen that is view-only, the new menu option you are creating will also be view-only. |
|
Screen Loaded Only |
Select this check box to disable the menu option until a valid record has been loaded on the screen. For example, you must load a product file in Product Maintenance to activate the screen. Therefore, the new menu item would be disabled until a product has been entered on the screen. |
|
Auth Key |
Assign an authorization key that the user must have assigned in order to access the new menu option. This can be a user-defined authorization key or a system designed and maintained authorization key. |
|
Level |
If the assigned authorization key has levels, indicate at which level the user must be to gain access to the new menu option. |
Click OK to save your new menu option.
Log out and back in to the system to see your new menu option.
See Also:
User-Defined Functions Overview