Customers and vendors send cash receipt information in a text file. For each cash receipt entry in the lockbox file, you must have the following set up to populate the Automatic Cash Receipts Review Queue.
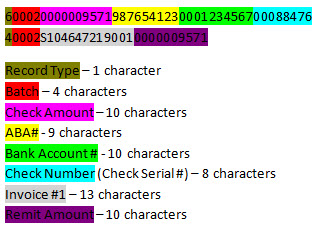
A record type 6 containing the record type, batch, check amount, ABA, account number, and check, number. For example: 600020000009571987654123000123456700088476.
A record type 4 for each order that is being paid containing record type, batch, invoice number, and remit amount. For example: 40002S1046472190010000009571. You can have as many of this record type as needed.
To change the format of the cash receipts update:
Display the character-based system.
Note: The process functionality for documents in your hold entries has not been incorporated into Solar Eclipse as of this release.
From the System > Printers menu, select Your Hold Entries to display the Spooler Control screen.
Position the cursor on the name of the update file, and use the Process hot key to display the User Defined Upload Processing screen.
In the Processing Type field, enter Spooler Cash Receipts and use the Begin hot key to display the Spooler Cash Receipts screen.
In the Work ID field, enter the work ID for this update. For more information, see Defining Cash Receipt Update Parameters.
A work ID can determine a format-specific template for processing a spreadsheet. It does not have to be customer- or vendor-specific. You can use the same work ID for different customers or vendors if several of them send their data in an identical format.
Use the Rec Layout hot key to display the Upload File Format screen.
In the Record Type field, enter one of the following formats for the update file:
Blocked - Fixed-length.
Variable - Comma-delimited.
Note: Data elements in a blocked record may also be separated by a delimiter.
In the Record Length field, enter the number of characters necessary if the vendor specifies a record length. Leave the field blank if the vendor does not specify a record length.
Note: This field is accessible only for blocked-type records.
In the Delimiter Char field, enter the character that is used between each field as a delimiter. This field is active only for variable record type files.
In the Delete Chars field, enter any characters you do not want read as data, such as quotation marks or the dollar sign.
The system does not recognize the dollar sign ($) as a numeric value, so enter a dollar sign in this field if the vendor puts a dollar sign in front of prices.
Press Esc to save the information and return to the Spooler Cash Receipts screen.
See Also: