Customers can make payments on their accounts for outstanding bills at any time. The system provides a process to accept payment by cash, check, or credit card (cash box payment) for these transactions. Instead of a payment being a deposit on an order, though, it is used to pay open Accounts receivable invoices. The system selects a valid bill-to or ship-to account and creates a sales order behind the scenes using a miscellaneous charge product and applies the cash to the account to the account. The payment displays in A/R Inquiries and A/R Summaries. You can receive payments for multiple orders, if needed.
Before receiving a payment on an account, complete the following setup:
Create a miscellaneous charge product item to use as a placeholder product for payments. The system uses the product on the sales orders it creates for payments. The product typically has a price of $0.00.
Create a new status code using
the
Set the
Set the
To change the processing fee set for a credit card payment, you must be assigned the AR.PAYMENT.BY.CC authorization key. To enter a negative payment for an account balance, enter a sales order with a line item comment and take the negative payment that way. The Account Payment window does not accept negative amounts.
To receive a payment for an account:
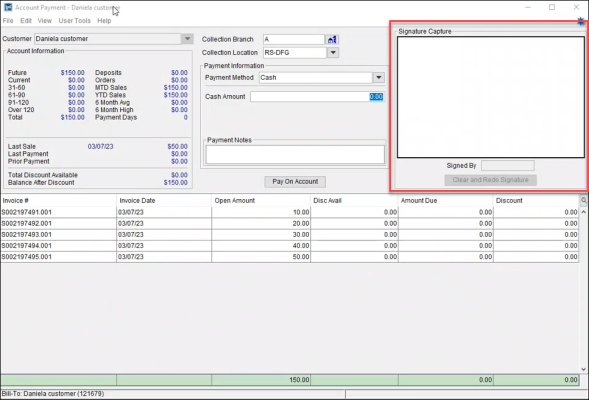
From the Orders menu, select Account Paymentto display the Account Payment window.
In the Customer field, enter the customer who wants to make a payment on their account.
In the CollectionBranch field, if needed, change to the branch that gets credit for the payment.
If the terminal you are working at has a defined price branch, the system defaults to that branch. If the terminal does not have a price branch defined, you can enter the branch that receives credit for the payment here. You can only enter branches for which you are authorized.
In the Collection Location field, if needed, change the location, such as Counter, to indicate which cash box the payment is being placed in. This could also be the site or store location at which payment was made, depending on your site setup.
Use the Invoice table to select which order to apply payment to:
For a single order, place the cursor on the line item and use the Spacebar to select the order.
For multiple orders, place the cursor on the line item and use the Spacebar to select the order. Continue to select orders until all orders the customer wants to apply payment to are selected. The Selected Orders Total field displays the cumulative total for the orders selected. For information about how the system handles multiple order payments, see Applying Payments to Multiple Orders at the bottom of this topic.
Note: Account selection is optional. Customer can make a flat payment to their outstanding balance. To do this, skip this step and move to Step 6 below.
Do one of the following based on the payment method:
To accept... | Do this... |
a cash payment |
Important: Change is not tendered for cash payments on an account. For example, if the customer owes $95 on their account and gives you $100 in cash, the system applies all $100 to their account. |
a check payment |
Note: If you are receiving payment for multiple orders the Selected Orders Total field displays the cumulative total for the orders selected in the Invoice table. |
a credit card payment |
Note: Due to government regulations, you cannot swipe a card to take payment on an account. |
Use the Payment Notes field to add notes about the payment to pass down to the order as a comment. These notes are printed on the customer receipt.
The Eclipse system can capture a signature for the payment record to the Account Payment window. When using the Ingenico 5000, Ingenico 7000, or an e-pad you can have your customer sign when making the payment.
You can use the signature capture feature for cash, check, or credit card payment methods. In the Signed By field, you can type the signer's name on the Account Payment widow. In addition, you can clear the signature.
Once you submit the payment, the system saves the signature to the invoice payment record.
You can retrieve the signature image from the Sales Order Entry window for the order. Select the image attachment icon.
Double-click the Signature Image For Order# line item. The viewer opens with the signature image.
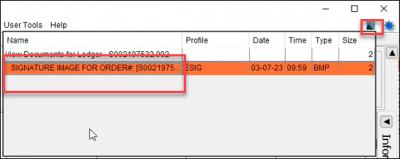
The Change Log indicates an “ESignature Capture” for the payment.
The system checks the account setting in the Customer and Credit Control Parameters on the customer account. A valid customer does not have the No Order Entry, Auto Delete, or Exclude from Index options selected.
If the account is valid, then the system does the following:
If the user selects... | then the system... |
Bill-To | selects the first valid ship-to account to use for the payment. |
Ship-To | selects the bill-to account to use for the payment. Note: If the user selects an invalid ship-to, then the system checks the associated bill-to and selects the first valid ship-to of that account. |
If the system cannot find a valid bill-to or ship-to account a message displays to indicate users must contact Accounts Receivable for more information.
You can use the Account Payment window to make payments on multiple orders for a customer. The process for paying multiple orders remains the same as above. For multiple payments, the following is true:
The Amount Due column displays the selected invoices (moves the amount over) and calculates a cumulative total at the bottom of the column. This amount matches the Selected Orders Totals field amount displayed below the payment method.
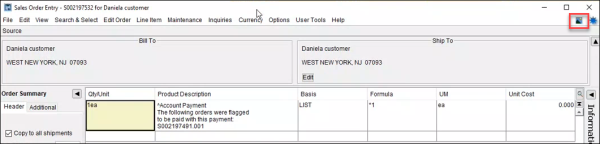
The tracker created by the system lists the sales orders paid and any notes associated with the payment:
![]()
The customer receipt lists the sales orders paid and any notes associated with the payment, similar to the image above.
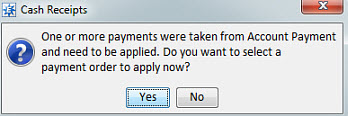
To help the user creating cash receipts, a message displays that an account payment has been taken for the customer. Users can answer Yes to display all sales orders created from Account Payment for the customer that do not have cash receipts applied. You can then select the order from the displayed list and continue.
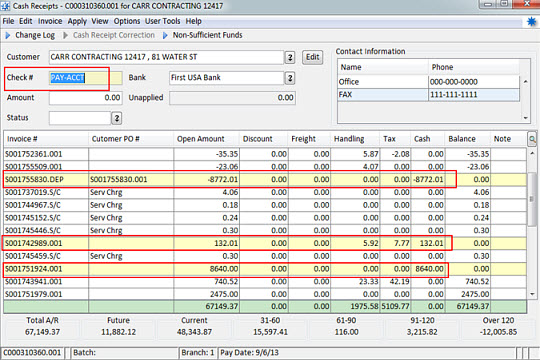
Lastly, after the account payment sales order is selected the Cash Receipts window displays the orders as selected. The system applies the orders with the payments and automatically populates the Check # field with PAY-ACCT. If this is correct, the Accounts Receivable person saves this cash receipt. If incorrect, then the Accounts Receivable person can select the correct orders to apply the payment and change the default check number, if needed.
See Also: