The following control maintenance records belong to the FORMS area within the GENRL (General) category. Set these records if you use the Eclipse Forms product.
For each branch and form type, select the type of printer on which that
form should print. ![]() More:
More:
|
Options |
|
|
Outcome of setting this control record |
Sets the printer on which each Eclipse Forms form type prints. |
|
Default Value(s) |
None |
|
Dependencies |
For the system
to recognize the settings in this record, set the |
|
Action if set to Null |
Same as if set to None. |
|
Additional Information |
None |
If you use the Eclipse
Forms product, select whether the system uses the logo set for the
pricing branch or the shipping branch when printing order documents. Set
Eclipse Forms logos in the
For RF branches only. These settings are only when using the Cut Product Queue in an RF branch. When you select products to cut and advance the step to Cutting, the system automatically prints a batch label. A Batch label is similar to a Tote label in size, (1x3), and is used to keep tract of the select products to cut. Labels can be scanned to enter in the Batch# header filter in the cuts product queue which will automatically select the products in that batch.
Label Format Subroutine - Enter the label subroutine to use when printing batch labels. The default is BATCH.OUT.
Form Loaded - Enter the Form to use for printer mapping. The default is Labels.
See SOE CMNT (Comments).
If you use the Eclipse Forms product and you cut products, such as wire or laminate, use this control maintenance record to define which subroutine is called, for example CUT_PRODUCT.OUT, and which form is used to print a label for the product cuts. The cut product label includes the location/lot for the warehouse picker, the name of the customer, the address receiving the cut product, and the group name.
If you use the Eclipse
Forms product, for each branch, enter when the cut ticket or cut label
should print. ![]() More:
More:
|
Options - Cut Ticket |
|
|
Options - Cut Label |
|
|
Options - Staging Ticket |
New in Release 9.0.2 This prints only from the Cut Product Queue.
|
|
Options - Auto Cut Process Lot Label |
New in Release 9.0 (Optional) Drop down selections based on the settings in the User Defined Product Label Format Maintenance screen. Define the correct label to print per branch. For example: Stock Label = LOT Large Zebra Label |
|
Outcome of setting this control record |
Determines whether to print or not print your ticket documents. The default printer location and combination of forms in that location determines to which printer these documents print. |
|
Default Value(s) |
For the default, if the system is using an auto-process ship via, then printing occurs when the orders are processed or released. If the system is not using an auto-process ship via, then prints occur when the cut is set to In Process in the Cut Product Queue. If you leave a field blank, the system treats it as a default entry. |
|
Dependencies |
None |
|
Action if set to Null |
Same as if set to Default. |
|
Additional Information |
For more information about cut tickets and labels, see Printing Cut Tickets and Labels. |
If you use the Eclipse
Forms product, for each branch, enter the number the Canadian government
provided to you for collecting and reporting your Goods and Services Tax.
![]() More:
More:
|
Options |
Free form text. |
|
Outcome of setting this control record |
This number prints on your sales forms when you use a Canadian tax, and is also used for reporting purposes. |
|
Default Value(s) |
None |
|
Dependencies |
The Eclipse Forms - Canadian Tax Types control record must be set to Yesfor GST. |
|
Action if set to Null |
Forms print without the GST tax number. |
|
Additional Information |
None |
Indicate if you want to exceed the default of 158 character limit for the width of the report. Set this control maintenance record to Yes to add space for additional columns to print. The default is No.
If you use the Eclipse
Forms product, for each branch, enter the number the Canadian government
provided to you for collecting and reporting your Harmonized Sales Tax.
![]() More:
More:
|
Options |
Free form text. |
|
Outcome of setting this control record |
This number prints on your sales forms when you use a Canadian tax, and is also used for reporting purposes. |
|
Default Value(s) |
None |
|
Dependencies |
The Eclipse Forms - Canadian Tax Types control record must be set to Yesfor HST. |
|
Action if set to Null |
Forms print without the HST tax number. |
|
Additional Information |
None |
If you use the Eclipse
Forms product, for each branch, enter the number the Canadian government
provided to you for collecting and reporting your Provincial Sales Tax.
![]() More:
More:
|
Options |
Free form text. |
|
Outcome of setting this control record |
This number prints on your sales forms when you use a Canadian tax, and is also used for reporting purposes. |
|
Default Value(s) |
None |
|
Dependencies |
The Eclipse Forms - Canadian Tax Types control record must be set to Yesfor PST. |
|
Action if set to Null |
Forms print without the PST tax number. |
|
Additional Information |
None |
If you use the Eclipse
Forms product, for each Canadian tax type, Harmonized Sales Tax (HST),
Goods and Services Tax (GST), and Provincial Sales Tax (PST), indicate
whether to include your tax number on your printed forms. ![]() More:
More:
|
Options |
For each tax type:
|
|
Outcome of setting this control record |
Indicates which Canadian tax numbers to include on your printed forms. |
|
Default Value(s) |
None |
|
Dependencies |
If you set any tax type to Yes, enter your tax ID numbers assigned to you from the Canadian government in the Eclipse Forms - Canadian GST Tax #, Eclipse Forms - Canadian HST Tax #, and Eclipse Forms - Canadian PST Tax # control maintenance records. Based on your Canadian tax jurisdiction, the system prints only one tax value, even if you have GST, HST, and PST to yes. |
|
Action if set to Null |
Forms print without your Canadian tax information. |
|
Additional Information |
None |
If you use the Eclipse
Forms product, use this control maintenance record to indicate where
to store the extracted files when printing so that they can be e-mailed.
Extracting is considered any non-.pdf file, such as .txt, .xml, or .csv.
![]() More:
More:
|
Options |
Enter the temporary directory path in which you want to store the extracted file so the system can locate it and e-mail it according to the setup directions. |
|
Outcome of setting this control record |
You must set up the file parameter if you want to e-mail (using Windows Direct) a report in the specified file attachment types: .xml, .csv, .txt. A .pdf file type goes through normal processing. |
|
Default Value(s) |
None |
|
Dependencies |
This directory needs to be added to the FormScape server and shared (just like the temporary .pdf directory). The “temp path” is the path to the file when on the FormScape server and the “network address” is the path to the directory from the eclipse box. |
|
Action if set to Null |
You cannot e-mail the price sheets through Windows Direct. |
|
Additional Information |
Extracting is considered any non-.pdf file, such as .txt, .xml, or .csv. |
If you use the Eclipse Forms product, for each document type that you use, enter size font you want to use to display the message you define the footer (the bottom portion) of the form.
If you use the Eclipse Forms product, for each document type that you use, enter size font you want to use to display the message you define the footer (the bottom portion) of the form.
If you use the Eclipse Forms product, for each document type that you use, enter size font you want to use to display the message you define the footer (the bottom portion) of the form.
If you use the Eclipse Forms product, for each document type that you use, enter size font you want to use to display the message you define the footer (the bottom portion) of the form.
If you use the Eclipse Forms product, for each document type that you use, enter size font you want to use to display the message you define the footer (the bottom portion) of the form.
If you use the Eclipse Forms product, for each document type that you use, enter size font you want to use to display the message you define the footer (the bottom portion) of the form.
If you use the Eclipse Forms product, for each document type that you use, enter size font you want to use to display the message you define the footer (the bottom portion) of the form.
If you use the Eclipse Forms product, for each document type that you use, enter size font you want to use to display the message you define the footer (the bottom portion) of the form.
If you use the Eclipse Forms product, for each document type that you use, enter size font you want to use to display the message you define the footer (the bottom portion) of the form.
If you use the Eclipse Forms product, for each document type that you use, enter size font you want to use to display the message you define the footer (the bottom portion) of the form.
If you use the Eclipse Forms product, for each document type that you use, enter size font you want to use to display the message you define the footer (the bottom portion) of the form.
If you use the Eclipse Forms product, for each document type that you use, enter size font you want to use to display the message you define the footer (the bottom portion) of the form.
If you use the Eclipse
Forms product, for each document type that you use, enter the
message you want to display in the footer (the bottom portion) of
the form. ![]() More:
More:
|
Options |
Free form text. |
|
Outcome of setting this control record |
Prints the entered message on the bottom of your acknowledgement forms. |
|
Default Value(s) |
None |
|
Dependencies |
The |
|
Action if set to Null |
No footer prints on your forms. |
|
Additional Information |
You can enter a unique message for each branch for each document type. To enter the same message for all your branches, enter the message for one branch, and then click Set All. To enter a message that is longer than the space on the screen, click Expand, type your message, and then click OK. |
If you use the Eclipse
Forms product, for each document type that you use, enter the
message you want to display in the footer (the bottom portion) of
the form. ![]() More:
More:
|
Options |
Free form text. |
|
Outcome of setting this control record |
Prints the entered message on the bottom of your bid forms. |
|
Default Value(s) |
None |
|
Dependencies |
The |
|
Action if set to Null |
No footer prints on your forms. |
|
Additional Information |
You can enter a unique message for each branch for each document type. To enter the same message for all your branches, enter the message for one branch, and then click Set All. To enter a message that is longer than the space on the screen, click Expand, type your message, and then click OK. |
If you use the Eclipse
Forms product, for each document type that you use, enter the
message you want to display in the footer (the bottom portion) of
the form. ![]() More:
More:
|
Options |
Free form text. |
|
Outcome of setting this control record |
Prints the entered message on the bottom of your credit memo forms. |
|
Default Value(s) |
None |
|
Dependencies |
The |
|
Action if set to Null |
No footer prints on your forms. |
|
Additional Information |
You can enter a unique message for each branch for each document type. To enter the same message for all your branches, enter the message for one branch, and then click Set All. To enter a message that is longer than the space on the screen, click Expand, type your message, and then click OK. |
If you use the Eclipse
Forms product, for each document type that you use, enter the
message you want to display in the footer (the bottom portion) of
the form. ![]() More:
More:
|
Options |
Free form text. |
|
Outcome of setting this control record |
Prints the entered message on the bottom of your direct PO forms. |
|
Default Value(s) |
None |
|
Dependencies |
The |
|
Action if set to Null |
No footer prints on your forms. |
|
Additional Information |
You can enter a unique message for each branch for each document type. To enter the same message for all your branches, enter the message for one branch, and then click Set All. To enter a message that is longer than the space on the screen, click Expand, type your message, and then click OK. |
If you use the Eclipse
Forms product, for each document type that you use, enter the
message you want to display in the footer (the bottom portion) of
the form. ![]() More:
More:
|
Options |
Free form text. |
|
Outcome of setting this control record |
Prints the entered message on the bottom of your invoice forms. |
|
Default Value(s) |
None |
|
Dependencies |
The |
|
Action if set to Null |
No footer prints on your forms. |
|
Additional Information |
You can enter a unique message for each branch for each document type. To enter the same message for all your branches, enter the message for one branch, and then click Set All. To enter a message that is longer than the space on the screen, click Expand, type your message, and then click OK. |
If you use the Eclipse
Forms product, for each document type that you use, enter the
message you want to display in the footer (the bottom portion) of
the form. ![]() More:
More:
|
Options |
Free form text. |
|
Outcome of setting this control record |
Prints the entered message on the bottom of your pick ticket forms. |
|
Default Value(s) |
None |
|
Dependencies |
The |
|
Action if set to Null |
No footer prints on your forms. |
|
Additional Information |
You can enter a unique message for each branch for each document type. To enter the same message for all your branches, enter the message for one branch, and then click Set All. To enter a message that is longer than the space on the screen, click Expand, type your message, and then click OK. |
If you use the Eclipse
Forms product, for each document type that you use, enter the
message you want to display in the footer (the bottom portion) of
the form. ![]() More:
More:
|
Options |
Free form text. |
|
Outcome of setting this control record |
Prints the entered message on the bottom of your purchase order bid forms. |
|
Default Value(s) |
None |
|
Dependencies |
The |
|
Action if set to Null |
No footer prints on your forms. |
|
Additional Information |
You can enter a unique message for each branch for each document type. To enter the same message for all your branches, enter the message for one branch, and then click Set All. To enter a message that is longer than the space on the screen, click Expand, type your message, and then click OK. |
If you use the Eclipse
Forms product, for each document type that you use, enter the
message you want to display in the footer (the bottom portion) of
the form. ![]() More:
More:
|
Options |
Free form text. |
|
Outcome of setting this control record |
Prints the entered message on the bottom of your purchase order forms. |
|
Default Value(s) |
None |
|
Dependencies |
The |
|
Action if set to Null |
No footer prints on your forms. |
|
Additional Information |
You can enter a unique message for each branch for each document type. To enter the same message for all your branches, enter the message for one branch, and then click Set All. To enter a message that is longer than the space on the screen, click Expand, type your message, and then click OK. |
If you use the Eclipse
Forms product, for each document type that you use, enter the
message you want to display in the footer (the bottom portion) of
the form. ![]() More:
More:
|
Options |
Free form text. |
|
Outcome of setting this control record |
Prints the entered message on the bottom of your return goods forms. |
|
Default Value(s) |
None |
|
Dependencies |
The |
|
Action if set to Null |
No footer prints on your forms. |
|
Additional Information |
You can enter a unique message for each branch for each document type. To enter the same message for all your branches, enter the message for one branch, and then click Set All. To enter a message that is longer than the space on the screen, click Expand, type your message, and then click OK. |
If you use the Eclipse
Forms product, for each document type that you use, enter the
message you want to display in the footer (the bottom portion) of
the form. ![]() More:
More:
|
Options |
Free form text. |
|
Outcome of setting this control record |
Prints the entered message on the bottom of your ship ticket forms. |
|
Default Value(s) |
None |
|
Dependencies |
The |
|
Action if set to Null |
No footer prints on your forms. |
|
Additional Information |
You can enter a unique message for each branch for each document type. To enter the same message for all your branches, enter the message for one branch, and then click Set All. To enter a message that is longer than the space on the screen, click Expand, type your message, and then click OK. |
If you use the Eclipse
Forms product, for each document type that you use, enter the
message you want to display in the footer (the bottom portion) of
the form. ![]() More:
More:
|
Options |
Free form text. |
|
Outcome of setting this control record |
Prints the entered message on the bottom of your statement forms. |
|
Default Value(s) |
None |
|
Dependencies |
The |
|
Action if set to Null |
No footer prints on your forms. |
|
Additional Information |
You can enter a unique message for each branch for each document type. To enter the same message for all your branches, enter the message for one branch, and then click Set All. To enter a message that is longer than the space on the screen, click Expand, type your message, and then click OK. |
If you use the Eclipse
Forms product, for each document type that you use, enter the
message you want to display in the footer (the bottom portion) of
the form. ![]() More:
More:
|
Options |
Free form text. |
|
Outcome of setting this control record |
Prints the entered message on the bottom of your Progress Billing invoices. |
|
Default Value(s) |
None |
|
Dependencies |
None. |
|
Action if set to Null |
No footer prints on your forms. |
|
Additional Information |
You can enter a unique message for each branch for each document type. To enter the same message for all your branches, enter the message for one branch, and then click Set All. To enter a message that is longer than the space on the screen, click Expand, type your message, and then click OK. |
If you use the Eclipse
Forms product, for each document type that you use, enter the
message you want to display in the footer (the bottom portion) of
the form. ![]() More:
More:
|
Options |
Free form text. |
|
Outcome of setting this control record |
Prints the entered message on the bottom of your Progress Billing ship tickets. |
|
Default Value(s) |
None |
|
Dependencies |
None. |
|
Action if set to Null |
No footer prints on your forms. |
|
Additional Information |
You can enter a unique message for each branch for each document type. To enter the same message for all your branches, enter the message for one branch, and then click Set All. To enter a message that is longer than the space on the screen, click Expand, type your message, and then click OK. |
If you use the Eclipse
Forms product and you use the E-Mail Stmt-Invs Lieu of Prt activity
trigger, you can set your customers to receive invoices in batches
through e-mail. ![]() More:
More:
|
Options |
|
|
Outcome of setting this control record |
Sends a single e-mail with multiple invoices attached in a single attachment or sends individual e-mails for each invoice. |
|
Default Value(s) |
Single. |
|
Dependencies |
The E-Mail Stmt-Invs Lieu of Prt and Batch Invs in Lieu of Print activity trigger must be set for the customer. Note: These both apply to the E-Mail Sales Doc and E-Mail Sales Doc HTML documents. |
|
Additional Information |
Based on your system e-mail settings regarding file size attachments, the system may send more than one e-mail to get the invoices sent. |
|
You can override the global setting at a customer level using the Pricing Information options in Customer Maintenance. |
If you use the Eclipse Forms product, for each branch, indicate Yes to remove the Freight Allowed box on the forms printed through Eclipse Forms. Enter No for each branch at which you want to include the Freight Allowed box on your forms.
New in Release 9.0
Set the number of copies to print for Pick Tickets in Eclipse Forms. Using this setting sends multiple copies of the document to the printer on the same tray, but does not allow printing to multiple trays. All ordered copies go to the tray configured for Pick or Ship tickets on the Eclipse Forms Printer Setup screen.
New in Release 9.0
Set the number of copies to print for Ship Tickets in Eclipse Forms. Using this setting sends multiple copies of the document to the printer on the same tray, but does not allow printing to multiple trays. All ordered copies go to the tray configured for Pick or Ship tickets on the Eclipse Forms Printer Setup screen.
If you use the Eclipse Forms product, for each branch, indicate Yes to include all the lines of a backordered product's description on forms printed through Eclipse Forms. Enter No for each branch at which you do not want to include the product description for backordered products. Including the backordered product description can help better identify the product later.
Select Yes to display "Serial # <number>" on the Sales Acknowledgment forms. If not set, the system will display Serial # UNASSIGNED.
Yes or No option to show the sales tax on the printed bid form.
If you use the Eclipse
Forms product, for each branch enter the path to the logo file you
want to use on forms printed at that branch. ![]() More:
More:
|
Options |
Any path to which your forms server has access. |
|
Outcome of setting this control record |
The system uses
this path and the setting in the |
|
Default Value(s) |
None |
|
Dependencies |
|
|
Action if set to Null |
No logo prints on your forms. |
|
Additional Information |
To enter the same path for all your branches, enter the path for one branch, and then click Set All. To enter a path that is longer than the space on the screen, click Expand, type the path, and then click OK. |
Use this record to enable or disable Eclipse Forms for individual users in the system. If Eclipse Forms is enabled at your site and you disable it for a user, the system continues to run with Eclipse Forms for all other users. Find the user's ID in the list and select Enabled or Disabled in the Eclipse Forms Override field. Click Save to save your changes.
Indicate if you want the system to truncate or wrap long lines on your Eclipse Forms reports.
New in Release 9.0.6
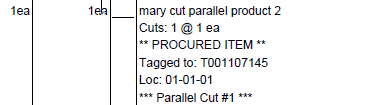
Indicate if you want to include procured cut products in the cutting
process by default. ![]() More
More
|
Options |
|
|
Outcome of setting this control record |
The cut ticket and label prints including the procured cut items along with a comment that the product is tagged to an order when the sales order completes processing. |
|
Default Value(s) |
No |
|
Dependencies |
None. |
|
Action if set to Null |
Same as if set to No. |
|
Additional Information |
The cut ticket displays the procured item information and the tagged order number:
|
Indicate whether to enable the ![]() More:
More:
|
Options |
|
|
Outcome of setting this control record |
Determines from where the system gets its printer type assignments. |
|
Default Value(s) |
No |
|
Dependencies |
If set to Yes,
ensure that the |
|
Action if set to Null |
Same as if set to No. |
|
Additional Information |
None |
If enabled per branch, this setting changes the function of the Zone header filter in the Cut Product Queue.
If set to Yes, then any zone entered will go and select any product that is in-process in that zone. Allows users to add non-cuttable products to the Cut Product Queue, for example pipe. This allows non-cut products to have the same flow using the Cut Product Queue.
Enter the message the system prints on the footer of pick tickets and ship tickets.
Indicate whether the discount should be applied on a credit memo from
Cash Receipts. ![]() More:
More:
|
Options |
|
|
Outcome of setting this control record |
The discount will not apply automatically. You can decide if you want to the discount to apply on credit memos. |
|
Default Value(s) |
No |
|
Dependencies |
None. |
|
Action if set to Null |
Same as if set to No. |
|
Additional Information |
If you apply a credit that has an available discount, the available discount is included automatically in Cash Receipts. When this control record is set to Yes, you must use the Options > No Discounts menu selection on Cash Receipts to ensure that the credit added in Cash Receipts matches the amount the customer expects on the Credit Memo. |
Enter the barcode form to use with the Shift-F12 hidden hot key combination that allows the user to print barcode labels for a customer, vendor, user, part number, activity log, or order ID.
For each branch, indicate whether the system holds the printing of pick
tickets for routed orders until after the system receives the routing
data from the third party routing software, such as RouteView. ![]() More:
More:
|
Options |
|
|
Outcome of setting this control record |
Determines when the pick ticket prints for routing orders. |
|
Default Value(s) |
No |
|
Dependencies |
For this control maintenance record to apply, you must use a third party routing software, such as RouteView or Roadnet. |
|
Action if set to Null |
Same as if set to No. |
|
Additional Information |
If you have an RF branch and are also using RouteView, set this record to No for that branch. |
For each order type, SOE, POE, TOE, and RF, select the default label
printing setting in the User-Defined Document/Label Printing. ![]() More:
More:
|
Options |
|
|
Outcome of setting this control record |
Allows you to set separate default label printing options for different order types. |
|
Default Value(s) |
Blank |
|
Example |
For example, the SOE setting is used as the Print Selection field default on the User Defined Document/Label Printing screen, which you can access using the Line Item > Label Printing option on an order's Body tab. |
|
Action if set to Null |
Same as if set to Current Item Only. |
|
Additional Information |
For more information about printing labels, see Printing User-Defined Forms and Labels. |
New in Release 9.0
Select the profile for logos that you want to use for all laser forms. You must have either the Document Imaging or Signature Capture companion product to use this option.
Note: This control maintenance record is used by the Eclipse custom programming team to enable logos for non-Eclipse Forms sites.
New in Release 9.0
For each branch indicate how you want your logo to fill the logo space for laser forms. Depending on the ratio you decide, the logo expands vertically to match the width. The aspect ratio is kept in tact. You must have either the Document Imaging or Signature Capture companion product to use this option.
Note: This control maintenance record is used by the Eclipse custom programming team to enable logos for non-Eclipse Forms sites.
If you use the Eclipse
Forms product, for each branch, select on which document types to
print barcodes. ![]() More:
More:
|
Options |
|
|
Outcome of setting this control record |
Printing barcodes on your forms allows you to scan the barcode to open the order in the system. |
|
Default Value(s) |
Blank |
|
Action if set to Null |
Same as if set to None. |
|
Additional Information |
None |
For each document type, such as acknowledgments and credit memos, indicate
whether you want to print the Eclipse part number for a product after
the product description. ![]() More:
More:
|
Options |
|
|
Outcome of setting this control record |
Includes the Eclipse part number as part of the product's description on documents that include products. |
|
Default Value(s) |
No |
|
Action if set to Null |
Same as if set to No. |
|
Additional Information |
None |
For each branch, select whether products on pick tickets and transfer
shipper tickets print according to the bin location for the product. ![]() More:
More:
|
Options |
Pick Tickets - Only the
products on pick tickets are printed according to bin location.
The product is printed on the pick ticket once for each location from which the product should be pulled to meet the order quantity. The quantity in the Ordered column for each entry on the pick ticket is the quantity that should be pulled from that location. Products are printed on a Pick Ticket in order, according to the product's location. When a product on a pick ticket has multiple locations from which it will be picked, that product's order on the pick ticket is determined by the first location from which that product should be picked, regardless of the quantity in each location. Products on a transfer are printed on the transfer shipper ticket only one time according to the order in which they were entered on the transfer order. Beneath the product description, the system lists the location or locations from which the product should be picked. |
|
Transfer
Shipper Tickets - Only the products on transfer shipper
tickets are printed according to bin location. The product is printed on the Transfer Shipper ticket once for each location from which the product should be pulled to meet the order quantity. The quantity in the Pick column for each entry on the Transfer Shipper is the quantity that should be pulled from that location. Products are printed on a Transfer Shipper in order, according to the product's location. When a product on a Transfer Shipper ticket has multiple locations from which it will be picked, that product's order on the Transfer Shipper ticket is determined by the first location from which that product should be picked, regardless of the quantity in each location. Products on a sales order are printed on the Pick Ticket only one time according to the order in which they were entered on the sales order. Beneath the product description, the system lists the location or locations from which the product should be picked. |
|
|
Both
- The products on both pick tickets and transfer shipper tickets
are printed according to bin location, as described above.
The products on both Pick Tickets and Transfer Shippers tickets are printed on the respective document once for each location from which the product should be pulled to meet the order quantity. The quantity in the Ordered column on the Pick Ticket or the Pick column on the Transfer Shipper ticket is the quantity that should be pulled from that location. Products are printed on either document in order according to the product's location. When a product has multiple locations from which it will be picked, that product's order on the respective document is determined by the first location from which that product should be picked, regardless of the quantity in each location. |
|
|
Neither
- The products on pick tickets and transfer shipper tickets
are not printed according to bin location. The products on a Pick Ticket or Transfer Shipper ticket are printed on the respective document only one time according to the order in which they were entered on the sales order or transfer order.
|
|
|
Outcome of setting this control record |
Provides a sort order for pick tickets and transfer tickets. |
|
Default Value(s) |
Blank |
|
Dependencies |
Before you set this control maintenance
record, you must set the |
|
Action if set to Null |
Same as if set to Neither. |
|
Additional Information |
Bin locations are sorted by number and then by letter. |
Set to Yes to let the system adjust the width of the bar code on Eclipse Forms to align with the Document Indexer.
Before printing pick or work tickets for cross dock tasks, select one
of the following to determine where the tickets print. ![]() More:
More:
|
Options |
|
|
Outcome of setting this control record |
Determines the printing location when cross docking material in warehouse. |
|
Default Value(s) |
No |
|
Action if set to Null |
Same as if set to No. |
|
Additional Information |
For more information, see Printing Pick or Work Tickets for Cross Dock Tasks in the Manual Warehouse Management documentation. |
You set a default printing label format for each branch. This control record makes printing shipping labels in WMS easier by having a preset label format.
Branch/Territory - This filters the branches you see in the list.
Branch - The list of branches based on the Branch/Territory filter you set.
WMS Default Shipping Label Format - Select the print format from the drop-down list box.
You set a default printing label format for each branch. This control record makes printing transfer labels in WMS easier by having a preset label format.
Branch/Territory - This filters the branches you see in the list.
Branch - The list of branches based on the Branch/Territory filter you set.
WMS Default Transfers Label Format - Select the print format from the drop-down list box.