You can import customer or vendor part number information from an Excel spreadsheet to display on the Customer or Vendor Specific Part Numbers window, or export customer part number information from the Customer or Vendor Specific Part Numbers window to an Excel spreadsheet.
This process does not require the use of Mass Load to populate the Customer or Vendor Specific Part Numbers window. Collect part number information from your customer in Microsoft Excel, save the file in tab-delimited text (.txt) format, and import it. To accurately import selected information, you must map column headings from the import file to Eclipse's field names on the Customer or Vendor Specific Part Numbers window.
Exporting customer part numbers requires no additional file manipulation or Eclipse setup before exporting data directly to an Excel spreadsheet.
To display the import or export utility:
Select one of the following, depending on which process you want to use:
Excel Import -Imports product data.
Excel Export -Exports product data.
Save the Excel spreadsheet you want to import in tab-delimited text (.txt) format.
Select Import From Excel to display the Import from Excel dialog box.
In the ImportData Information area, set up the options as needed:
For the option... |
Do the following... |
Import Type |
Select one of the following:
|
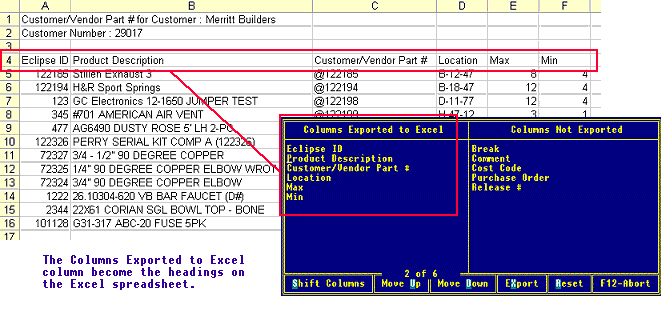
Start Column Import on Row |
Enter the row number from the spreadsheet from which to start importing product information. For example, if the spreadsheet has column
headings on the first row, |
Use User Defined Column Headings |
Select the check box to display ### for each Eclipse heading listed in the Columns Imported From Excel column under the Imports Columns tab. Match the spreadsheet headings to the Eclipse field names listed in the User-Defined Headings tab. If you leave this option unselected, the system uses Excel's A, B, C headings to map Eclipse fields from the Customer or Vendor Specific Part Numbers window. Excel's A, B, C headings display for each field name listed in the Columns Imported From Excel column under the Imports Columns tab. Note: If you check this item, you cannot use the Insert Blank hot key to add blank lines to the Columns Imported From Excel column. |
Column Headings Located on Row |
Enter the row number where the user-defined headings appear on the import file. |
In the Columns Imported From Excel column, use the Add, Remove, Move Up, and Move Down buttons to list the Eclipse column headings for the product information you want to import. This list is the product information you will be importing.
The Product ID item is required in the Columns Imported From Excel column for the system to match its product ID or description to the product information on the spreadsheet. The product ID can be the Eclipse part number or the exact product description.
You can use the Insert Blank hot key to add blank lines to this column only if the Use User Defined Column Headings field on the Data Info screen is set to N.
To restore the list to its original or last saved version, select File > Recall Work.
If you selected the Use User Defined Column Headings check box, click the User Defined Headings tab and map the column headings on the User Defined Column Heading column with the Eclipse column headings in the Columns Imported From Excelcolumn.
Note: The Columns Imported From Excel column lists the field names from the Customer or Vendor Specific Part Numbers window that represent the information to be imported.
Select File > Import to browse to select the text (.txt) file to import, and then click Open to import the file to the Customer or Vendor Specific Part Numbers window.
From the Customer or Vendor Specific Part Numbers window, select Edit > Export ToExcel to display the Excel Export dialog box.
In the Columns
Exported to Excel column, use the Add,
Remove, Move
Up, and Move Down buttons
to list the Eclipse headings in the order you want them to appear
on the exported
spreadsheet.
To restore the list to its original or last saved version, click Reset.
Click Export to select a destination, name the file, and click Open to export the Excel spreadsheet to that location.
See Also: