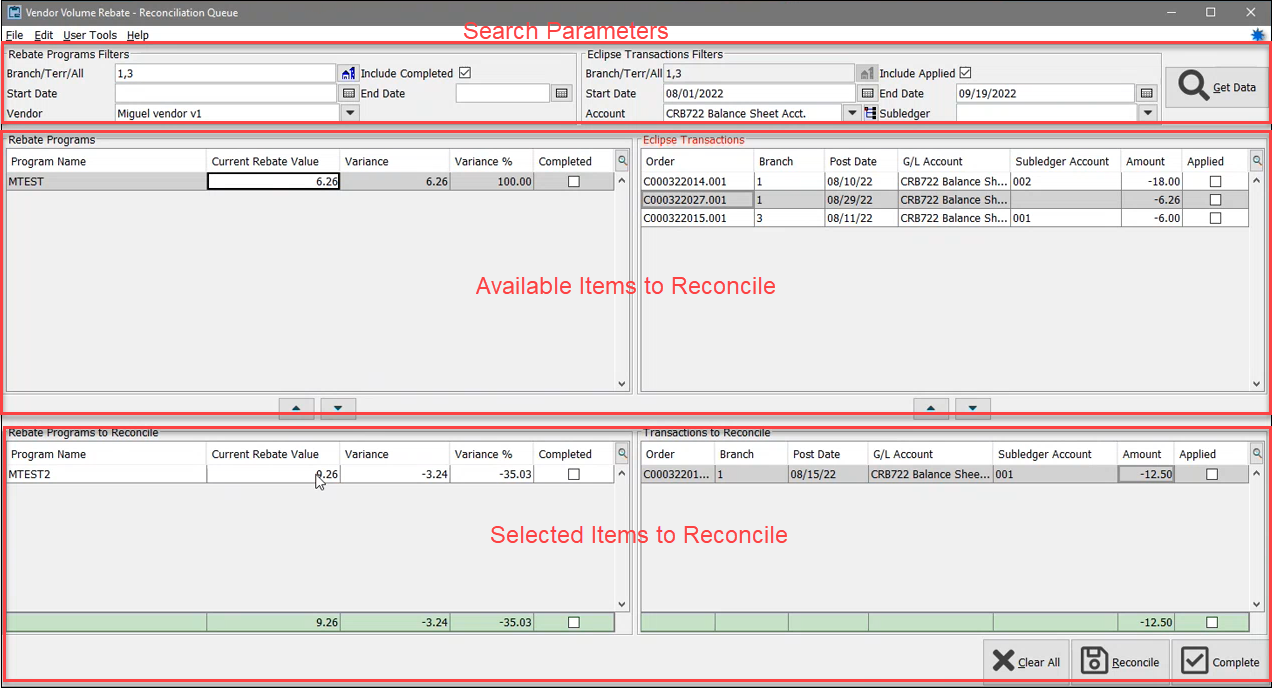
You have a way to match rebate transactions with the program. The Vendor Volume Rebate - Reconciliation Queue provides you with transactions and programs to match them to, enabling you to reconcile the amounts.
To locate the new window, navigate to Purchase > Vendor Volume Rebates > Vendor Volume Rebate - Reconciliation Queue.
Use the top section to set parameters for the rebate program and transaction search. The next section is populated with the rebate programs and transactions the system retrieves based on your criteria. You use the lower section to view the items you are matching up for reconciliation.
The parameter section is divided into the Rebate Programs Filters and the Eclipse Transactions Filters.
Set the parameters to search for programs and related transactions to reconcile as follows.
In the Branch/Terr/All field, choose the branch and/or territory to search for the data. This is a required field. Once you make you selection, the corresponding field in the Eclipse Transactions Filters section is populated with the same value.
In the Rebate Programs Filters section, enter the Start Date and End Date, if you choose. This is optional. If no date is entered, all dates are searched.
From the Vendor list field, select a vendor that uses a rebate program. This is a required field.
Select the Include Completed check box to retrieve programs that have already been reconciled.
In the Eclipse Transactions Filters section, enter the Start Date and End Date for the transactions to reconcile. The Start Date is required and the End Date is optional.
From the Account list field, select the GL account for the rebate transactions. This is a required field.
Select a related Subledger, if you choose.
If you want to show the transactions that have already been reconciled, select the Include Applied check box.
Select the Get Data button. The system retrieves the items based on your parameters and displays them in the Rebate Programs section and the Eclipse Transactions section.

After the system retrieves the rebate program and Eclipse data, you can begin selecting items for reconciliation.
Refer to How to Add More Matching Columns section to include columns that may help with reconciling the rebate transactions.
From the Rebate Programs section, highlight a program and then select the down arrow button. The system moves the program to the Rebate Programs to Reconcile section to reconcile.
From the Eclipse Transactions section, highlight the transactions you want to use in the reconciliation and then select the down arrow button. The system moves the transactions to the Transactions to Reconcile section.

After you select the program and items to reconcile, review the totals in the green bar to see if they match.
Continue to move transactions to/from the Transactions to Reconcile section, if needed.
When you are satisfied with the totals match, select the Complete button. The system marks the program as Completed and marks the transactions as Applied.

You can save your work without completing the reconciliation. If you are in the middle of reconciliation and want to retain the matching, select the Reconcile button. This will NOT complete the reconciliation. It only saves your work up to that point. When you select the program again, the system displays the items that you previously matched in the reconcile section.
The Vendor Volume Rebate window has more columns that you can add to simplify the process of matching transactions with rebate programs.
There are two parts to complete to add the necessary data to the Vendor Volume Rebate queue.
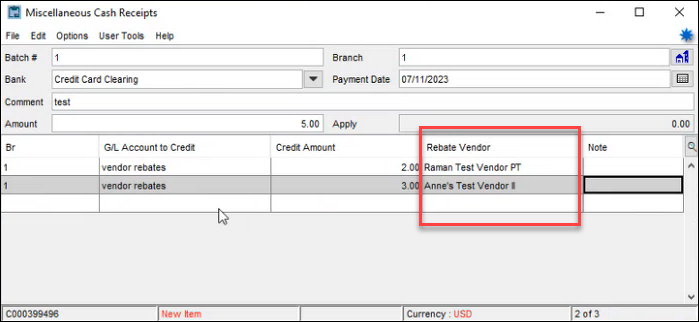
Firstly, add the rebate vendor name to the A/R Miscellaneous Cash Receipts window.
Secondly, add the AR Vendors ID column and the AR Vendors Name columns to the Eclipse Transactions grid of the Vendor Volume Rebate window.
In Miscellaneous Cash Receipts window add a User Defined View that adds the Rebate Vendor column along with the other typical columns. Follow the typical process for adding a User Define View.
After you apply the view, complete the cash receipt for the rebate.
In the Rebate Vendor column, select a Vendor ID or vendor name associated with the rebate for the line item.
On a single cash receipt you can enter multiple vendors.
Once added, orders with an associated rebate transaction for the vendor will appear on the Vendor Volume Rebate window.
In the Vendor Volume Rebate window add a User Defined View that adds the Vendor Name, AR Vendor ID, and AR Vendor Name columns along with the other typical columns. Follow the typical process for adding a User Define View.
Select the custom view for both the Eclipse Transactions grid and the Rebate Programs grid.
Eclipse Transactions grid - The AR Vendors ID and AR Vendors Name columns.
Rebate Programs grid - The Vendor Name columns.
Once added, you can use the columns for additional data during reconciliation of your rebate programs. Refer to Reconciling the Rebate Items with the Program section.