Defining the View of the Information Panel
The Information Panel can provide quick and useful information about an item on your sales order. You can make it even more useful by defining the information the system displays in the panel that is meaningful to you.
You have multiple ways to define the type of information the system displays on the Information Panel.
-
To define the type of data the system displays on the Information Panel and arrange it in the order that you want, access the User Design window.
-
Define a personalized default view for the Information Panel by creating a design template and assigning it to your user profile. Use the Panel Template Design window to define your view. The system uses the template design you assign to yourself as the design for the reset option. You can also assign a template in a control record.
When you choose the information to display on your Information Panel and arrange it, that is referred to as a design. You can create a "user design" or a "template design." The following describes the ways you can apply a design and how the system handles application of the design.
-
Designing and applying within Sales Order Entry - You create a user design and apply it through the User Design window located in the Sales Order Entry window. A design saved here takes precedence over template designs that are applied in the control record and through your user profile. Refer to the User Design section for more information.
-
Applying a template to a user profile - You can apply a template to your user profile through User Maintenance. The system uses the template you apply to your user profile as the default view and for the panel reset option in the Sales Order Entry window. A template that you assign at the user level takes precedence over the template set in the control record. But changes made in through the User Design option on the Sales Order Entry window overrides the view of any template, until the view is reset.
-
Applying a template in the control record - You can set a default template at the system level in a Control Record. A template that you assign at the user level takes precedence over the template set in this control record. If there is no template at the user level, then the system level template in the control record applies as the default and as the reset view. But changes made in through the User Design option on the Sales Order Entry window overrides the view of any template, until the view is reset.
User Design
Arrange and select the type of data you want to see in the Information Panel through the User Design window. The system saves this panel arrangement until you reset it or change it. Setting the panel design in the User Design window takes precedence over template designs assigned in the control record and through your user profile.
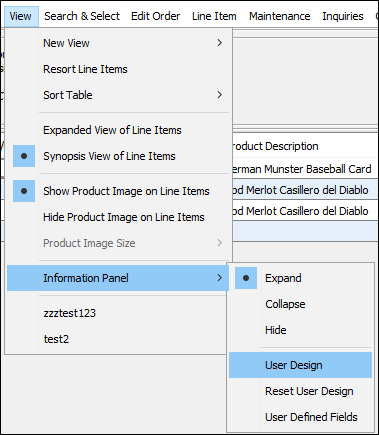
- With an order open in the Sales Order Entry window and the Information Panel expanded, navigate to View
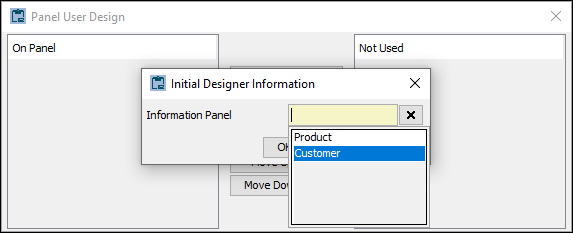
> Information Panel > User Design. The system opens the Panel Template Design window and displays the Initial Designer Information box.
- On the Initial Designer Information box, from the Information Panel field, select the type of Information template you are working on (Product or Customer). The system displays the Product Panel User Design window or the Customer Panel User Design window.
- On the Product Panel User Design window, use the Add and Remove buttons to define which data fields you want the system to display on the Information Panel.
Note: The Panel User Design window contains the data fields that are available to display on the Information Panel. Those data fields currently in use are in the On Panel section. Any other fields that the system is not currently using is in the Not Used section.
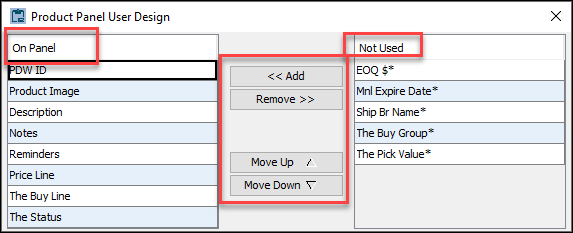
- To rearrange the order of the fields, select a data field in the On Panel section and then use the Move Up and Move Down buttons.
Note: The order of the data fields in the On Panel section is the order the system displays the data on the Information Panel.
Create and Assign a Template Design
Use the Template Design feature to create an arrangement of information that becomes a template design. With a template you can assign it to yourself as your default design in User Maintenance. Whenever you select to reset your Product Panel design, it reverts to the template you save in your User Maintenance profile.
Note: You can set a default template at the system level in a Control Record (refer to Order Entry Product Panel Template in the SOE Default Parameters Control Records topic). A template that you assign at the user level takes precedence over the template set in this control record. If there is no template at the user level, then the system level template in the Control Record applies.
Create and assign a template as follows.
-
Navigate from the Eclipse Main Menu to Tools > Order Entry Information Panel > Template Design. The system opens the Panel Template Design window and displays the Initial Designer Information box.
-
On the Initial Designer Information box, from the Information Panel field, select the type of Information template you are working on (Product or Customer).
-
From the Template ID list box, select New to create a new template, and then click OK. The system displays the New Template ID box.
Note: If you select to edit a current one, the system displays the template arrangement in the Panel Template Design window. You can edit any of the templates available, even those you did not create.
In the New Template ID field, enter a name for your template, and then click OK. The system displays the Panel Template Design window.
The elements under On Panel are all standard system fields. If there are user-defined fields, they appear in the Not Used side and have an asterisk next to them.
Work with the Product Panel design elements by selecting elements, using the Add, Remove, Move Up, and Move Down buttons. For additional information, refer to the User Design section above.
After you finish arranging your elements in the Panel Template Design window, save your design.
To assign the design template as your default view, navigate to User Maintenance.
Select the user in the User Maintenance window, then navigate to Maintenance > Order Entry Information Panel Templates. The system displays the Order Entry Information Panel Templates box.
On the Order Entry Information Panel Templates box, select the template to use as the default template from the list boxes (Product Panel Template and Customer Panel Template).
The templates available are those that were created in the Template Design window.
While working in the Sales Order Entry window, you can still make changes to your panel view. The system remembers those changes when you open the Sales Order Entry window again. When you reset the Product Panel view the system uses this template as the default view.
User Defined Fields
Create or edit user defined fields associated with the Information Panel through the User Defined Fields window. You define the type of data you want to display on the Information Panel.
You can navigate to the User Defined Fields window from the Sale Order Entry window or through the Eclipse Main Menu.
Note: To have the User Defined Fields option available, assign the OE.PANEL.UD.FIELDS authorization key. This is a new authorization key. It allows you to see the menu option and then create or edit user-defined fields for the Sales Order Panel. If you navigate to User Defined Fields from the Eclipse Main Menu, the User Defined Fields window opens. A warning message displays if you do not have the authorization key assigned.
With an order open in the Sales Order Entry window and the Information Panel expanded, navigate to View
> Information Panel > User Defined Fields. The system opens the User Defined Fields window. Alternate navigation is from the Eclipse Main Menu select Tools > Order Entry Information Panel > User Defined Fields.
From Panel ID, select the panel type you are working with, either Product or Customer.
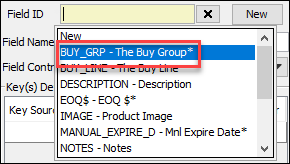
To edit an existing data type, select an ID from the Field ID list box. The Field ID has a list of fields that are standard to the Information Panel and any user-defined fields. The user defined fields show an asterisk next to them.
For standard fields, you can only edit the Field Name.
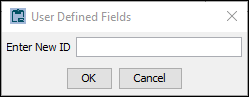
To create a user-defined data field, select the New button.
In the Enter New ID field, enter a short name to use for the Field ID.
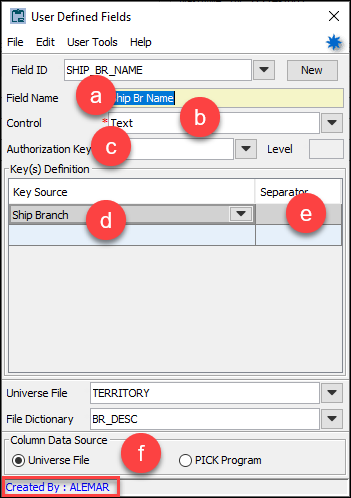
Complete the remaining fields to define the user defined field. The following diagram illustrates the fields to complete on the User Defined Fields window.
Note: After you complete the user defined field, you can add it to the Information Panel using the Product Panel User Design window.
Field Name - Descriptive title for the field the system displays on the Information Panel. This is the only field you can edit for a standard system data field.
Control - Choose between text field or text box. This is the type of field the system uses to display the information.
Authorization Key and Level - Assign an authorization key and level that the user must have assigned in order to view the information field.
Key Source - The Key Source that matches the record ID in the file that the data is coming from.
Separator - A data separator, such as an asterisk, if the file or program you are using requires it.
Column Data Source - Select the type of file you are using for the column data.
Universe File - When you select the Universe File, complete the Universe File field and the File Dictionary field. For the Universe File field, select the system file the data comes from. For the File Dictionary field, select the item within the file that you want to populate on the table.
PICK Program - When you select PICK Program, choose the program you want to run.
The information bar at the bottom of the window has the user ID for who created the user defined field. Eclipse Standard Field means this is a standard system field.
See Also:
SOE Default Parameters
Sales Order Entry Body Attributes