Use the Solar Eclipse File Import utility to load an import profile or create a new import profile, and set the Import Map parameters for importing data. The utility provides the necessary tools to define how you want the data to be loaded into your record files. After selecting your import profile, the system displays the fields in the profile.
Note: You
must create your Import Profile
prior to setting up these parameters.
You can select the New Import Map
button that is next to the Import Map ID field, to name a new mapping.
You can import your column headers and organize your spreadsheet. You can insert, delete, and reorder the columns in the spreadsheet without having to adjust the import map because the import run off the headers rather than the actual column position. This makes the field maps less ambiguous and easier to follow.
Note: By default, tool tips display in this functionality. If you do not want to see them, deselect Show this tool tip again on the window.
The Solar Eclipse File Import can import the following file types:
Text file (.txt).
Comma-separated value file (.csv). The files columns must also be comma-delimited and have a new line for each new row.
Excel format (.xlsx). This is only available for the import through the Sales Order Entry window.
To set up import map parameters:
Access the Solar Eclipse File Import window.
From the Tools > Importing menu, select Solar Eclipse File Import.
With an order open from the Sales Order Entry window, select Edit Order > Import > Solar Eclipse File Import.
Note:
Access through Sales Order Entry
window only when importing purchase order information for a job bid.

In the Import Map ID field, select the import profile for which you want to map parameters.
The system populates the Map
Description and Import Profile
fields with the profile's current information. In the Field
Map area, the system displays the selected profile's fields in
the Field Name column.
In the Import
File field, enter or select the file that contains your values.
Use the Browse button  to locate the file needed.
The system displays a sample of the selected file with the first five rows of information. The available fields from the selected file display in the Field Map tab.
In the Delimiters
section, select the option you want to use to divide the data
you are importing with your spreadsheet. (Comma, Tab, Semicolon, Pipe,
Space, Other) For example, if you are importing a .csv file this is
a comma-separate value file and most often uses a comma to separate
data between columns.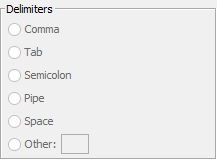
Note: If you change the Delimiter, you can select Refresh Preview from the Preview Table menu to display the sample data using the selected delimiter.
In the Options area, address the following parameters and settings:
Option | Description |
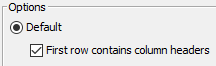
Default | The default is to designate the first row of the import file as your column header names. The system then populates the first Import File Map rows with the corresponding values.
Note: If you clear the check box for First row contains column headers, the system renders the preview data with no headers and assumes the data starts on line 1. Deselecting and re-selecting this check box causes the system to reload the file. Some adjustments may be lost when this action is taken. |
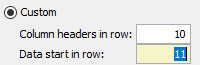
Custom | Select Custom to designate the row number for the header and the row number the data starts. For example, for Column headers in row, enter 10. For Data start in row, enter 11.
|
Use the Field Map tab to define your field values.
Column | Description |
Field Name | The field name to display in the import utility that users see when running the process. When importing payables, the following fields are required: Invoice Number, Invoice Amount, Payable Date, Payable Branch, G/L Account, Vendor ID,Purchase Order Number, andPO Order ID (PO Header). |
Import File Map | Indicate which column from the import file the system should use to populate this field value. Note: This column is mutually exclusive from Constant Value column. |
Constant Value | Indicate what value you want the system to use for this field. If specified, then the system does not use the import file values for this field. Note: This column is mutually exclusive from Import File Map column. |
Default Value | Enter the constant value required. If the value from the corresponding column on the mapped file is empty when imported, then the system uses this value. Note: Fields that must have an entry in this field display Default Required. Fields are marked as required in Import Profile Maintenance. Users receive a message if they try to exit the map without completing required fields. |
If you change any of the parameters, you can redisplay the preview table. From the Preview Table menu, select Refresh Preview. The system reloads the information from the selected file.
Note:Eclipse helper programs must be loaded for this feature to work.
Use the Actions tab to tell the system what to do with the data after import.
Use the Notifications tab to indicate who to contact when certain conditions are met after import.
Use the Import Errors tab to review errors the system received when importing your data file.
Note:If errors occur, the system alerts you that errors were received and give you the option of opening the file.
See Also: